はじめに
普段は業務系のアプリの開発に携わっているので、 リッチなUIやUIのカスタマイズという部分は、求められることや実際の経験というのは少ないのかなと思っていたりします。
そんなことを思い始めたので、よく見るものから「どうなってるんだろ?」と調べて実装してみたので、 それを書いていきたいと思います。
UIAlertControllerを自作する
今日はこの話で書きます。
デフォルトのUIAlertControllerで実際は楽々済むのですが、 意外とちょっとした場面で見たり、今後自身が必要だと思うことが当然のようにあるのではないかと思って作ってみました。
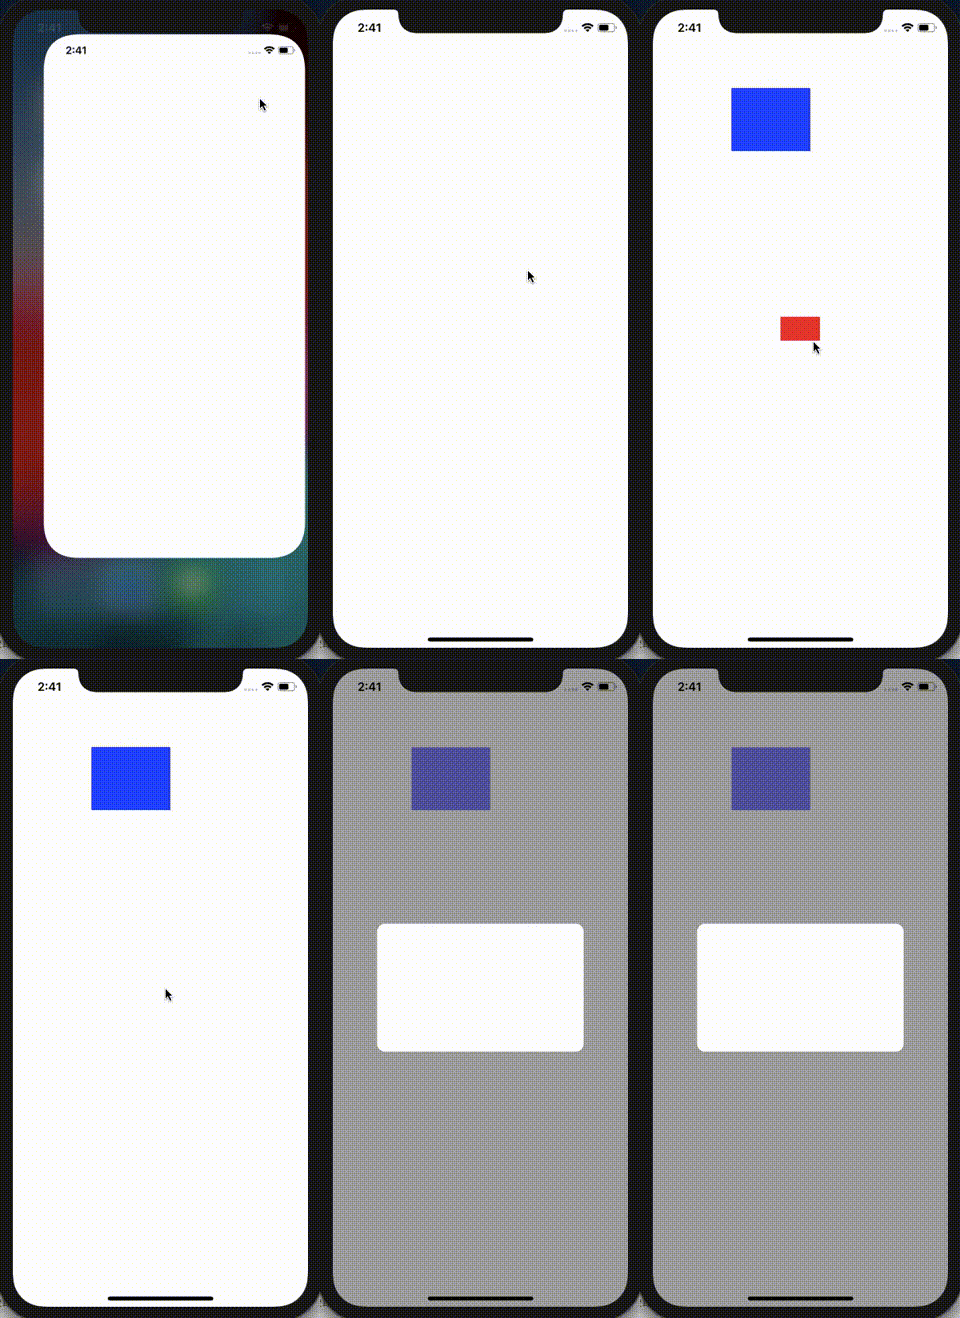
完成はこんな感じになります。

今日の内容はアニメーションで表示させるところまでで、実際のAlertの中のボタンやタイトル、メッセージの実装は省略します。
自作するにあたって
これは調べて見たら、そこまで複雑な実装はないことがわかりました。 以下の2つのプロトコル(1つはデリゲート)を実装することで、表示の遷移のアニメーションを表現することができました。
- UIViewControllerAnimatedTransitioning
- UIViewControllerTransitioningDelegate
この2つは画面遷移に関するアニメーションを実現するAPIで、これを使用することで 2つのクラスを作成して、自作のAlertを実現します。
- AlertAnimation (アラートの表示時のアニメーションを実装する) UIViewControllerAnimatedTransitioningに準拠
- AlertController (アラートのViewを管理する) UIViewControllerを継承、UIViewControllerTransitioningDelegateに準拠
AlertControllerを作る
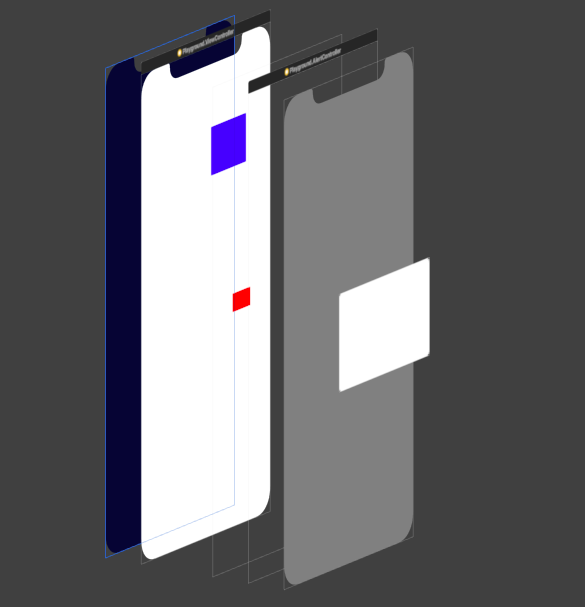
画面の構成はこんな感じです。

右2つのViewから成り立っています。
- 右から2番目の薄いグレーのView (UIView)
これは標準のUIAlertControllerでも見るのもので、一時的にアラート以外の入力はできないようにしたり、アラートだということを示すための土台となるViewです。
- 一番右のView (UIView)
これが実際のアラートの画面です。今回は省略していますが、ここにボタンやタイトルなどを配置していきます。
実装コードはこのようになります。
import UIKit

class AlertController: UIViewController, UIViewControllerTransitioningDelegate {

    //1. の土台のView
    lazy var baseView: UIView = {
        let view = UIView()
        view.backgroundColor = UIColor.gray
        view.translatesAutoresizingMaskIntoConstraints = false
        return view
    }()

    //2. のアラートのView
    lazy var AlertView: UIView = {
        let view = UIView()
        view.backgroundColor = UIColor.white
        view.layer.cornerRadius = 10
        view.translatesAutoresizingMaskIntoConstraints = false
        return view
    }()

    override init(nibName nibNameOrNil: String?, bundle nibBundleOrNil: Bundle?) {
        super.init(nibName: nibNameOrNil, bundle: nibBundleOrNil)
        //init時に宣言しないと、前の画面を透過しない
        self.providesPresentationContextTransitionStyle = true
        self.definesPresentationContext = true
        self.modalPresentationStyle = UIModalPresentationStyle.custom
        self.transitioningDelegate = self
    }

    required init?(coder aDecoder: NSCoder) {
        fatalError("init(coder:) has not been implemented")
    }

    override func viewDidLoad() {
        super.viewDidLoad()
        layoutView()
    }

    func layoutView() {
        view.addSubview(baseView)
        view.addSubview(AlertView)

        baseView.leadingAnchor.constraint(equalTo: self.view.leadingAnchor).isActive = true
        baseView.topAnchor.constraint(equalTo: self.view.topAnchor).isActive = true
        baseView.bottomAnchor.constraint(equalTo: self.view.bottomAnchor).isActive = true
        baseView.trailingAnchor.constraint(equalTo: self.view.trailingAnchor).isActive = true

        AlertView.centerXAnchor.constraint(equalTo: self.view.centerXAnchor).isActive = true
        AlertView.centerYAnchor.constraint(equalTo: self.view.centerYAnchor).isActive = true
        AlertView.widthAnchor.constraint(equalTo: self.view.widthAnchor, multiplier: 0.7).isActive = true
        AlertView.heightAnchor.constraint(greaterThanOrEqualTo: self.view.heightAnchor, multiplier: 0.2).isActive = true
    }

    func animationController(forDismissed dismissed: UIViewController) -> UIViewControllerAnimatedTransitioning? {
        return AlertAnimation(true)
    }

    func animationController(forPresented presented: UIViewController, presenting: UIViewController, source: UIViewController) -> UIViewControllerAnimatedTransitioning? {
        return AlertAnimation(false)
    }

}
また、実際にアラートっぽく表示させるためにデリゲートに準拠します。
class AlertController: UIViewController, UIViewControllerTransitioningDelegate {

    //...中略

    //表示時のアニメーション
    func animationController(forDismissed dismissed: UIViewController) -> UIViewControllerAnimatedTransitioning? {
        return AlertAnimation(true)
    }

 //閉じる時のアニメーション
    func animationController(forPresented presented: UIViewController, presenting: UIViewController, source: UIViewController) -> UIViewControllerAnimatedTransitioning? {
        return AlertAnimation(false)
    }

}
returnしているAlertAnimationはアニメーションが実装されているクラスで、この後説明します。 このDelegateによってアニメーション(画面遷移)をAlertAnimationに委譲します。
Animationを実装する
画面遷移のアニメーションを実装するには、UIViewControllerAnimatedTransitioningに準拠し、 以下2つのメソッドを実装する必要があります。
 //アニメーションの時間
    func transitionDuration(using transitionContext: UIViewControllerContextTransitioning?) -> TimeInterval

 //実際のアニメーション処理
    func animateTransition(using transitionContext: UIViewControllerContextTransitioning)
実際のコードは以下のようになりました。
class AlertAnimation: NSObject, UIViewControllerAnimatedTransitioning {

    //true: dismiss
    //false: present
    let isPresent: Bool

    init(_ isPresent: Bool) {
        self.isPresent = isPresent
    }

    func transitionDuration(using transitionContext: UIViewControllerContextTransitioning?) -> TimeInterval {
        return 0.25
    }

    func animateTransition(using transitionContext: UIViewControllerContextTransitioning) {
        if isPresent {
            dismissAnimation(transitionContext)
        } else {
            presentAnimation(transitionContext)
        }
    }

    //表示時のアニメーション
    func presentAnimation(_ transitionContext: UIViewControllerContextTransitioning) {
        let alert = transitionContext.viewController(forKey: UITransitionContextViewControllerKey.to) as! AlertController

        let container = transitionContext.containerView

        alert.baseView.alpha = 0
        alert.AlertView.transform = CGAffineTransform(scaleX: 0.5, y: 0.5)

        //すでにfromのviewControllerはaddSubviewされているので、addSubviewやinsertSubviewの必要はない
        container.addSubview(alert.view)

        UIView.animate(withDuration: transitionDuration(using: transitionContext),
                       animations: {
                        alert.baseView.alpha = 0.7
                        alert.AlertView.transform = CGAffineTransform(scaleX: 1.1, y: 1.1) },
                       completion: { bool in
                        UIView.animate(withDuration: 0.1, animations: {
                            alert.AlertView.transform = CGAffineTransform.identity
                        })
                        transitionContext.completeTransition(true) })

    }

 //閉じる時のアニメーション
    func dismissAnimation(_ transitionContext: UIViewControllerContextTransitioning) {

        let alert = transitionContext.viewController(forKey: UITransitionContextViewControllerKey.from) as! AlertController

        UIView.animate(withDuration: 0.3, animations: {
            alert.baseView.alpha = 0
            alert.AlertView.transform = CGAffineTransform(scaleX: 0.8, y: 0.8)
        }, completion: { finished in
            transitionContext.completeTransition(true)
        })
    }

}
表示の時も、閉じる時も同じanimateTransition(using transitionContext: UIViewControllerContextTransitioning)が呼び出されるため、
Bool値で判定させて、処理を分岐しています。
transitionContextのviewConroller(forkey: UITransitionContextViewControllerKey)で、遷移元と遷移先のViewControllerを取得できるので、
そのViewをCGAffainTransformやUIView.animateを使用してアニメーションを実装すれば、アニメーション処理は終わりです。
画面を透過させるために
ただし、これだけだとUIAlertControllerのように遷移元の画面が透けて見えるようになりません。 それを実現するためには先ほど作成したAlertControllerのinit時に以下のプロパティを設定する必要があります。
class AlertController: UIViewController, UIViewControllerTransitioningDelegate {

    override init(nibName nibNameOrNil: String?, bundle nibBundleOrNil: Bundle?) {
        super.init(nibName: nibNameOrNil, bundle: nibBundleOrNil)
        //init時に宣言しないと、前の画面を透過しない
        self.providesPresentationContextTransitionStyle = true
        self.definesPresentationContext = true
        self.modalPresentationStyle = UIModalPresentationStyle.custom
        self.transitioningDelegate = self
    }
}
プレゼンテーションのスタイルを設定するプロパティで、これを設定することで遷移元のviewControllerの画面が透過して見えます。